Lucid Nightmare
| Lucid Nightmare | |
|---|---|
| Type | Official |
| Creator | Blizzard Entertainment |
| Discovered | 2017-08-30 |
| Completed | 2017-09-02 |
Main Page > List of Investigations > World of Warcraft > Lucid Nightmare
The Lucid Nightmare was a puzzle trail hidden inside the massively multiplayer online role-playing game World of Warcraft, made by Blizzard Entertainment. The end goal of the puzzle trail was to unlock a mysterious mount, which is called Lucid Nightmare.
All steps must be followed in order, as the subsequent items and locations are either unavailable or uninteractable otherwise.
The primary solving hub for this puzzle was the WoW General Secret Finding Discord.
First Note

On August 30, 2017, an Inconspicuous Note was discovered in Curiosities and Moore, Dalaran (Broken Isles). After being activated, the note reads:
It begins in the 2104059.
With a most pleasing sign.
(These letters will not always rhyme.)
The seven numbers in the first line are an anagram for a date: 2009-4-15. This date was the release date of Ulduar, another in-game region.
Accordingly, the next clue was found in Ulduar.
You must activate this note to proceed.
Second Note

After heading to Ulduar and killing Flame Leviathan, a Dusty Lever can be found on a pile of scrap in the far left corner of the room containing the XT-002 Deconstructor boss. When activated, a 20 by 20 grid of lights appears on the floor of the room. Each light can be individually toggled by the player.
The lights must be toggled into a pleasing sign, as described by the first Inconspicuous Note. This sign is a pixelated appromixation of the sigil of Mimiron, the creator of both the Leviathan and Deconstructor bosses.
-
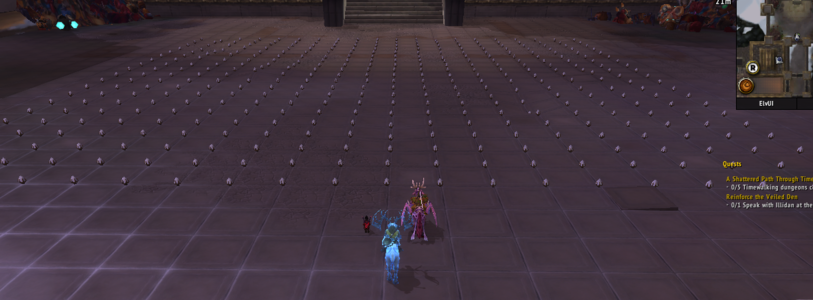 The initial 20x20 light grid
 -
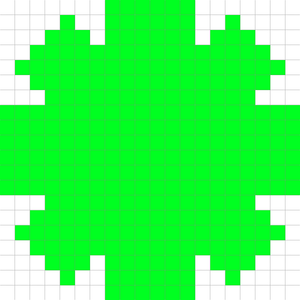 The correct pattern of illuminated lights

Once the pattern is completed, another Inconspicuous Note appears in the center of the room, which reads as follows:
1000 years imprisoned.
Surely it weighs on the mind.
The note describes the Vault of C'Thun, in the Temple of Ahn'Quiraj, which was sealed 1000 years ago according to the game's lore.
You must activate this note to proceed.
Third Note

Deep within the Temple of Ahn'Quiraj (AQ40), there is a side path beyond the entrance of the final boss's chamber. At the top of the staircase there, a Mind Larva can be found on an altar. Activating the Mind Larva will begin a Jewelcraft-style minigame, named "Mindcraft", on an 8 by 8 grid floating in front of the player character's face.
In this genre of game, symbols can be swapped with their horizontal or vertical neighbors, and if that swap forms a row or column of at least 3 identical symbols, the matched symbols are removed from the grid. Symbols above the empty space fall down into it, which may cause further matches and removals, and any remaining space at the top of the grid is filled with newly generated random symbols.
-
 The Bejeweled grid

The win condition for this minigame is not explained in-game, and players initially passed it by brute force. A postmortem developer post revealed that the win condition is to match five brains in a row.
Upon winning the minigame, the third Inconspicuous Note will appear next to the Mind Larva on the altar. It reads:
Deeper than deep.
Awaits your seat.
The note was interpreted as a hint towards Deepholm.
You must activate this note to proceed.
Fourth Note
The Crumbling Depths, a cave in the north-east corner of Deepholm's lower reaches, contains a "dark fissure" that is only visible to players who have completed the previous step. Clicking it will alert the player that there is no exit before allowing you to enter. Inside is a single stone chair, or seat, as described in the previous Inconspicuous Note. There is a skull upon the seat, along with a Dingy Plaque on its back.
-
 The cave in Deepholm, coordinates (58.3, 25.6)
 -
 The fissure in the Crumbling Depths, coordinates (63.8, 22.5)
 -
 Dingy Plaque on the back of the chair in the fissure


The Dingy Plaque's text is different in every localization. In English, it reads as follows:
<The plaque is old and barely legible. You can only make out fragments of each line of text.>
Supremacy?
Get…
Shirk…
… eke...

While the English text contains only complete words, other languages contained nonsense fragments, which suggested the presence of an anagram. Attempting to locate one led to the partial discovery of the phrase the key is along with the letters ACEEGKMPUSRR. Comparison to the German translation revealed that subtracting the equivalent phrase der Schlüssel ist from that language's text left the same set of letters, implying that anagramming was likely the correct approach.
On the second day of puzzle solving, the full anagram was discovered to be RACKSUM GREEP IS THE KEY. Racksum Greep is a goblin NPC in Ratchet, who can be found at coordinates (69,70) in the Northern Barrens. The anagram was validated in all other languages, despite the varying localizations of the ciphertext and the differences in the NPC's name.
Racksum Greep is wearing a specific mask necessary to progress: the craftable Shadoweave Mask. While the pattern for this mask was removed in a prior expansion, as of patch 7.3, the pattern now drops from Dark Iron Steamsmiths in Searing Gorge. Upon returning to the dark fissure in Deepholm with the Mask equipped, the skull on the chair becomes interactable. (The other items worn by Greep have no effect, and the prior removal of the mask's pattern may have been a hint as to its special relevance.)
Many players have encountered various temporary bugs at this step. Be sure that:
- You have the Shadoweave Mask equipped before entering the Dark Fissure.
- You are not in a group.
- You are on your home realm.
If you are still having issues, try reloading your interface or relogging.
Using the skull while wearing the Shadoweave Mask causes a large purple explosion, and spawns the fourth Inconspicuous Note at the foot of the chair, which reads:
Where the shaded delegate may appear.
The shaded delegate is a reference to a rare spawn called the Dark Iron Ambassador, who may appear in Gnomeregan.
You must activate this note to proceed.
Fifth Note

After interacting with the fourth Inconspicuous Note, a set of 10 consoles becomes interactable in Gnomeregan, at coordinates (37, 55), on the Launch Bay floor of the dungeon map, between the Launch Bay and Engineering Labs. Each console holds a digit from 1 to 9 (excluding 0), and offers dialog options to increase or decrease its value by one.
Near the levers is a plaque with a set of encoded "instructions" that vary along with the client's locale. Most locales have a ciphertext that contains mostly 5, 8, or 24 digit-long "words" in binary. However, in the zhTW locale, the text instead contains digits on the range [1,5] rather than binary.
In English, the binary text reads:
01110111 00100 10010110 10101
11110111 01100 01111111 01000
011010111001011010010110 10111101
11001 00111111 10010 01001001
10000 011010010110100111010110
01011011 11110 11110001 11111
11100000 00010 11111111 01000
10110111 10101 01111111 00001
10101110 11111 00110000 01000
101101010010101110010110

180

+1111111111

The first chunk of binary is divided into 5-, 8-, and 24-bit "words". Each 8-bit word is followed by a single 5-bit word. By multiplying the number of 1's in an 8-bit word with the number of 1's in the following 5-bit word, we can obtain a number; for the 24-bit words, the number of 1's is simply counted. This process yields the following numbers:
6 12 14 7 13 18 12 3 13 20 25 3 8 18 7 25 2 13
These numbers can then be translated into letters, based on the positions of letters in the alphabet:
F L N G M R L C M T Y C H R G Y B M
These letters refer to 3 battle pet abilities: Falling Murloc, Mighty Charge, and Eye Beam, which deal 684, 560, and 1110 damage respectively. Concatenating these numbers yields:
6845601110
The next line of the instructions, 180, is a clue to reverse this number:
0111065486
The final line of the instructions, +1111111111, indicates that a 1 should be added to each digit:
1222176597
Setting the consoles to 1222176597 by repeatedly interacting with them causes the fifth Inconspicuous Note to spawn, which reads as follows:
Games and toys are left behind.
When you awaken screaming.
This was interpreted as a clue towards Val'Sharah.
You must activate this note to proceed.
Sixth Note

At coordinates (66, 36) in Val'sharah, an interactable Nightmare Tumour was discovered. Activating the Tumour causes a synapse-like organism bearing the name of the Old God Il'gynoth to appear, and say:
Il'gynoth says: AL'KSH SYQ IIR AWAN? IILTH SYTHN AQEV.
Translated from Shath'yar, the language of Il'gynoth:
Is this real or an illusion? You are going mad.
Additionally, using the Tumour commences a minigame that follows the rules of Blingtron's Circuit Design Tutorial. The minigame begins with a number of randomly-positioned points, which are each connected to two other points by line segments. Any two points can be swapped, moving their attached line segments with them. Line segments that do not intersect any others are colored blue, while those that do intersect are red.
The objective of this minigame is to turn all of the line segments blue, by "untangling" all the lines and vertices. Here is an example solution:

Once all the lines have turned blue, the sixth Inconspicuous Note appears in front of the tumour:
What you seek is buried within.
This was determined to lead towards the Tomb of Secrets, in the Valley of Emperors in Kun-Lai Summit.
You must activate this note to proceed.
Seventh Note


At coordinates (53, 49) of Kun-Lai Summit, an urn of ashes was discovered at the base of a Mogu statue. Interacting with the urn yields an option to consume the ashes. Selecting this option brings up a prompt:
WARNING: You are about to consume the ashes of an evil sorcerer. There is no way to tell what will happen. Are you VERY sure you want to do this?
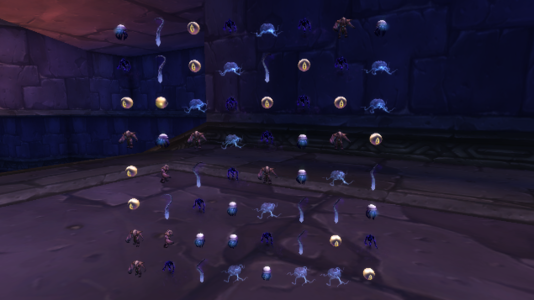
Clicking "Accept" teleports the player to a square room in Endless Halls, a randomly generated maze puzzle. Each room contains an altar ringed by torches and a doorway in each of the cardinal directions. Every room is visually identical, except for three details: rubble may block some exits, the torches at the altar may be lit with a colored flame, and there may be a colored rune on the altar. The torches and runes may be red, yellow, green, blue, or purple.
To solve the maze, the player needs to click a torch of each color to acquire that color's orb, and bring it to the matching rune. Only one color of orb may be carried at once, and once delivered, the rune vanishes.
Several mechanics make navigating this maze the most difficult part of the trail:
The maze is arranged on an 8x8 grid of rooms. Each cell has between one and four exits. However, if it would have 4 exits, it’s actually not a single room, but two two-way rooms that occupy the same space, but don’t intersect. These Non-Intersecting Cross rooms are the first major source of confusing discontinuity, and also cannot contain any Orbs or Runes.

The second main source of disorientation is the edges. They loop around, but not directly. Instead, exiting one end of the maze will send you to the other side of the maze, with an additional offset. This makes it very difficult to tell what room you will end up in if you cross the edge of the map.  You can, however, reliably backtrack from your new position to your previous position. Many players made frequent use of this backtracking to reliably navigate the maze without getting lost.

In addition, there is one final wrench thrown into the gears: the Teleportation Trap. Within the maze, a single room is the Teleportation Trap. When you enter this room, you are instead secretly teleported to a random room in the maze. Once you’ve identified the Teleportation Trap room, avoid it at all costs!
To navigate the maze, it is highly recommended that you draw a map to keep track of your progress. Additionally, the Lucid Nightmare Helper add-on can be used to help keep track of your location within the maze.
Exiting the room after placing an orb at all 5 runes takes the player to a final room, where the seventh Inconspicuous Note is lying on an altar:
The way is now open.
To the greatest secret never told.
A fitting end to your journey.
The note was a hint towards the Forgotten Crypt, a well-known and partially completed area next to Karazhan. The Crypt has existed from the game's earliest releases, but was never completed or opened, although it has been previously explored via exploits.
You must activate this note to proceed.
Lucid Nightmare

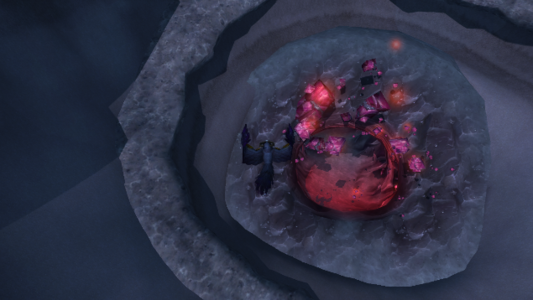
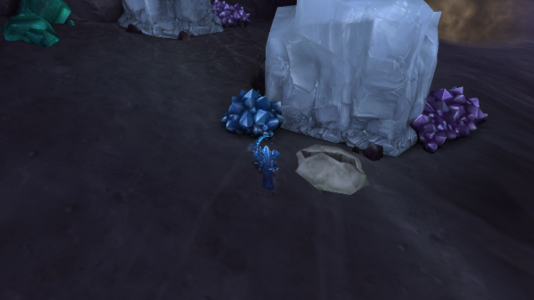
After activating the seventh Inconspicuous Note, the entire Forgotten Crypt is permanently opened for the player character. It is located behind the graveyard at Karazhan, at coordinates (37, 75) in Deadwind Pass. One chamber deep within contains a large mound of bones. There is a box on top of the pile of bones; opening it sets off a fireworks sound effect and yields the Lucid Nightmare mount.
Some other quests may temporarily interfere with the player's ability to acquire the mount at this final step. In particular, the quest for the Affliction warlock hidden appearance is known to change the phase of Deadwind Pass, causing the chest to be invisible. Either completing or abandoning such quests should cause the chest to appear.

Quick Guide


For players more interested in acquiring the mount than the explanations and history of its discovery, follow these steps:
- Find and read the Inconspicuous Scroll on the upper level of Curiosities and Moore, across from the fishing fountain in Dalaran (Broken Shore).
- Travel to Ulduar, and click the Dusty Lever on the far left scrap pile in XT-002 Deconstructor's room. Click the lights to form the pattern on the right, then read the scroll that appears in the center.
- Travel to the Temple of Ahn'Qiraj (AQ40). Go past C'Thun's room, and click the Mind Larva on the altar. Match five brains in the Bejeweled minigame. Read the scroll on the altar.
- Purchase or craft a Shadoweave Mask, then travel to the Crumbling Depths in northeast Deepholm. Equip the Mask, then locate the Dark Fissure in the main chamber, just past the circling gyreworm. Drop into the Fissure, then click the skull on the chair in the center of the chamber. Read the scroll.
- Enter Gnomeregan, and locate the "Instructions" plaque and ten consoles on the northeast side of the Engineering Labs, on the Launch Bay floor of the dungeon map. By repeatedly "talking" to the consoles, enter the number
1222176597. Read the scroll that appears. - Travel to the northeast edge of Shala'nir, in Val'sharah. Inside a house there, click on the Nightmare Tumour. Complete its minigame by untangling the lines by clicking dots to swap them. Read the scroll that appears.
- Travel to the Tomb of Secrets in Kun-Lai Summit and click the Urn on the pedestal. Solve the maze by locating the lit torches that hold the colored Orb debuffs, and returning them to their matching runes. Note that the maze has an unusual geometry and "warps" the player, and attempts at mapping it should take that into account. It may be easier to map the maze while leaving all of the torches and runes in place, as they are the only landmarks. When you have removed all of the runes, you will be teleported to a room containing the final scroll. Read it.
- Travel to Karazhan in Deadwind Pass. The previously barricaded Crypt behind the graveyard there is now open to you. In the most remote room of the Crypt, on a pile of bones, you will find the chest containing the Lucid Nightmare.
Players can track their progress by running this script:
/run local N,t,d={"DAL","ULD","AQ","DEEP","GNOMER","VAL","MAZE","MOUNT"},{47826,47837,47841,47850,47852,47863,47881,47885} for s,k in pairs(N)do d=IsQuestFlaggedCompleted(t[s]) print(k,"=",d and "\124cFF00FF00" or "\124cFFFF0000NOT","DONE")end
Recommended Add-ons
- TomTom - Allows players to place waypoints on both the map and the minimap
- Lucid Nightmare Helper - A utility to help with mapping the maze puzzle