Difference between revisions of "Battlefield 1"
| [unchecked revision] | [unchecked revision] |
(→Fifth Message: Removed this part: "Otherwise, the player will need to use rails 5 offset 6.", unless there's a working example) |
m |
||
| Line 12: | Line 12: | ||
[[Main Page]] > [[List of Investigations]] > '''Battlefield 1''' | [[Main Page]] > [[List of Investigations]] > '''Battlefield 1''' | ||
| − | This wiki page documents the ARG that is hidden in [https://www.battlefield.com/games/battlefield-1 Battlefield 1]. | + | This wiki page documents the ARG that is hidden in [https://www.battlefield.com/games/battlefield-1 Battlefield 1]. This page includes step-by-step instructions to unlock the secret "'''A Beginning'''" and "'''A Conflict'''" dog tags. Currently, the primary solving hub for this ARG is the Battlefield Easter Egg community, who have a Discord server [https://discord.gg/BFEE here], a wiki [http://bfee.co/ here], and a YouTube channel [https://www.youtube.com/channel/UC50wtGn_g_DswmJErm9dKyw here]. |
In addition to the main ARG/Easter egg which unlocks the secret dog tags, there are several other prominent Easter eggs which have been discovered in the game: | In addition to the main ARG/Easter egg which unlocks the secret dog tags, there are several other prominent Easter eggs which have been discovered in the game: | ||
| Line 34: | Line 34: | ||
== Headphones and Morse code == | == Headphones and Morse code == | ||
| − | One pair of headphones is hidden on each map. | + | One pair of headphones is hidden on each map. The headphones are indestructible and can be located on every server, as long as they have not already been picked up. It appears that there are 5 spawn locations per map, although some of them remain undiscovered. The headphones can be picked up by any player by walking over them. Upon approaching a hidden telegraph station after having retrieved a pair of headphones, the player will hear some [https://en.wikipedia.org/wiki/Morse_code Morse code] being tapped out. A player can carry only one pair of headphones at a time, and only the player wearing the headphones will be able to hear the Morse code when near enough to a hidden telegraph station. |
=== Headphone Locations === | === Headphone Locations === | ||
| − | Here is is a series of images, made by RenegadeX5, which display locations of headphones and telegraph station on each map. | + | Here is is a series of images, made by RenegadeX5, which display locations of headphones and telegraph station on each map. In order to hear the Morse code, you need to pick up the headphones from one of the 5 locations on each map (you might need to check all 5 before finding them!) and bring them to the telegraph station. |
(''Note: you can click each image to get a larger version.'') | (''Note: you can click each image to get a larger version.'') | ||
| Line 54: | Line 54: | ||
</gallery> | </gallery> | ||
| − | When the headphones and telegraph stations were first discovered, the Morse code was meaningless gibberish. | + | When the headphones and telegraph stations were first discovered, the Morse code was meaningless gibberish. However, the contents of the Morse code changed in future patches. |
=== Fall Update === | === Fall Update === | ||
| Line 77: | Line 77: | ||
=== Winter Update === | === Winter Update === | ||
| − | On February 14, the Winter Update was released. | + | On February 14, the Winter Update was released. The Morse code changed again, to the following message: |
| − | GO STRAIGHT TO <location_name>. | + | GO STRAIGHT TO <location_name>. OLD METHODS COMPROMISED. MUST ACQUIRE NEW KEY. WILL MISS DROPOFF IF DELAY OR INCORRECT LOCATION. |
| − | Each user hears a different location name; '''locations are randomly assigned to players.''' There are 27 locations total: 3 locations on each of the 9 maps. | + | Each user hears a different location name; '''locations are randomly assigned to players.''' There are 27 locations total: 3 locations on each of the 9 maps. In order to advance through the Easter egg, you need to know which location you are assigned; [https://www.youtube.com/watch?v=-jG5Z3mftVk here] is a tutorial (courtesy of Dunem) to help you read your Morse code. This is the list of locations, along with their respective maps, in alphabetical order: |
* <code>AMIENS NEUF FURNITURE</code>: '''Amiens''' | * <code>AMIENS NEUF FURNITURE</code>: '''Amiens''' | ||
| Line 111: | Line 111: | ||
* <code>VARENNES SERVANT BED</code>: '''Ballroom Blitz''' (Formerly <code>APREMONT RITZ BED</code>) | * <code>VARENNES SERVANT BED</code>: '''Ballroom Blitz''' (Formerly <code>APREMONT RITZ BED</code>) | ||
| − | The message will repeat until you move away from the telegraph station, at which point the telegraph station will explode. | + | The message will repeat until you move away from the telegraph station, at which point the telegraph station will explode. Each of the locations mentioned above has a symbol near it. |
==== Symbols ==== | ==== Symbols ==== | ||
| − | The first symbols discovered at each location are difficult to find; they are small double arrows pointing to the left and right, and only appear when the player comes within 0.4 meters. | + | The first symbols discovered at each location are difficult to find; they are small double arrows pointing to the left and right, and only appear when the player comes within 0.4 meters. A player will typically need to crouch or go prone in order to be able to see their symbol. Additionally, players can only see the symbol at the location they've been "assigned" to. When examining a symbol up close, a distinct sound is played ([https://youtu.be/oDrKidX8CiM?t=70 video]). Pictured below are all 27 symbol locations, sorted by the map they appear on (maps made by Darrel). |
'''NOTE:''' If you're having trouble finding your location with the images below, Jambajeww has made a [https://www.youtube.com/watch?v=C5JgOWtxQ2M video guide] for all 27 locations, with timestamps for each location in the description of the video. | '''NOTE:''' If you're having trouble finding your location with the images below, Jambajeww has made a [https://www.youtube.com/watch?v=C5JgOWtxQ2M video guide] for all 27 locations, with timestamps for each location in the description of the video. | ||
| Line 135: | Line 135: | ||
[[File:Triangle Example.png|200px|thumbnail|right|A triangle symbol discovered at the <code>VARENNES SERVANT BED</code> location]] | [[File:Triangle Example.png|200px|thumbnail|right|A triangle symbol discovered at the <code>VARENNES SERVANT BED</code> location]] | ||
| − | After a player discovers their symbol, returning to a telegraph station with headphones yields another message in Morse code. | + | After a player discovers their symbol, returning to a telegraph station with headphones yields another message in Morse code. Additionally, the telegraph station's lights glow '''yellow''' instead of their usual white when broadcasting this message. The message starts with one of the above location names, but reversed: |
<code><reversed_location_name> REMEMBER FIRST RULE. IF COMPROMISED L PILL.</code> | <code><reversed_location_name> REMEMBER FIRST RULE. IF COMPROMISED L PILL.</code> | ||
| − | An <code>L PILL</code> is short for [https://en.wikipedia.org/wiki/Suicide_pill lethal pill], a pill intended to be taken by soldiers to commit suicide rather than be tortured. | + | An <code>L PILL</code> is short for [https://en.wikipedia.org/wiki/Suicide_pill lethal pill], a pill intended to be taken by soldiers to commit suicide rather than be tortured. Visiting the specified reversed location, the second location, yields a triangle symbol in place of the normal double-arrow symbol. The second symbol appears in the exact same spot that the first symbol may appear for other players. |
==== Third Message ==== | ==== Third Message ==== | ||
| Line 145: | Line 145: | ||
[[File:Third symbol.png|thumbnail|130px|right|The third symbol that can be discovered (credit to Noizex)]] | [[File:Third symbol.png|thumbnail|130px|right|The third symbol that can be discovered (credit to Noizex)]] | ||
| − | After a player discovers the triangle symbol at their second location, returning to a telegraph station with headphones yields another message. | + | After a player discovers the triangle symbol at their second location, returning to a telegraph station with headphones yields another message. This time, the telegraph station's lights glow '''purple'''. Here's the text of the message: |
<code><atbash_cipher> SECOND RULE. SIGHTING. REPORT AND WAIT. INVESTIGATING ALONE COULD LEAD TO DEATH</code> | <code><atbash_cipher> SECOND RULE. SIGHTING. REPORT AND WAIT. INVESTIGATING ALONE COULD LEAD TO DEATH</code> | ||
| − | Solving the [http://rumkin.com/tools/cipher/atbash.php Atbash cipher] in the message yields another location from the [[Battlefield 1#Winter Update|list above]]. | + | Solving the [http://rumkin.com/tools/cipher/atbash.php Atbash cipher] in the message yields another location from the [[Battlefield 1#Winter Update|list above]]. Visiting the third location leads to an arrow symbol pointing right. |
==== Fourth Message ==== | ==== Fourth Message ==== | ||
| Line 155: | Line 155: | ||
[[File:Fourth symbol.png|thumbnail|130px|right|The fourth symbol (credit to Noizex)]] | [[File:Fourth symbol.png|thumbnail|130px|right|The fourth symbol (credit to Noizex)]] | ||
| − | Returning to a telegraph station after discovering the third symbol yields ''yet another'' message. | + | Returning to a telegraph station after discovering the third symbol yields ''yet another'' message. This time, the telegraph station's lights glow '''green''' (previously, they glowed white, yellow, and purple for the first, second, and third messages respectively). Here's the text of the message: |
<code><rot_cipher> THIRD RULE. IF TAKEN BY THE OTHERS DISCOVER MEANS TO COMMUNICATE TO HOUSE</code> | <code><rot_cipher> THIRD RULE. IF TAKEN BY THE OTHERS DISCOVER MEANS TO COMMUNICATE TO HOUSE</code> | ||
| Line 165: | Line 165: | ||
[[File:Fifth symbol.PNG|130px|thumbnail|right|The fifth symbol (credit to Dexx)]] | [[File:Fifth symbol.PNG|130px|thumbnail|right|The fifth symbol (credit to Dexx)]] | ||
| − | After finding the fourth symbol, the telegraph station's light color turns '''transparent'''. | + | After finding the fourth symbol, the telegraph station's light color turns '''transparent'''. This message begins with a location from the [[Battlefield 1#Winter Update|list of locations]], reversed and encoded with the [http://rumkin.com/tools/cipher/railfence.php rail fence cipher], with 5 rails, and 0 offset. (Note: Some players report rails 5 offset 0 does not yield plaintext. The ciphertext must be reversed before it is input into the rail fence cipher to get plaintext with rails 5 offset 0.). Note that the previous symbol, the fourth symbol, is in the shape of a fence, which may be interpreted as a hint for the correct decryption method for this cipher (rail fence cipher). Here's the format of the message: |
<code><rail_fence> FOURTH RULE. KILL ALL ON SAME TRAIL. REMOVE DOG TAGS AND REPORT TO HOUSE</code> | <code><rail_fence> FOURTH RULE. KILL ALL ON SAME TRAIL. REMOVE DOG TAGS AND REPORT TO HOUSE</code> | ||
| Line 177: | Line 177: | ||
[[File:Symbol_6.png|130px|thumbnail|right|The sixth symbol, "Edward" (credit to Noizex)]] | [[File:Symbol_6.png|130px|thumbnail|right|The sixth symbol, "Edward" (credit to Noizex)]] | ||
| − | After finding the fifth symbol, the telegraph station's lights turn to an '''orange''' color. | + | After finding the fifth symbol, the telegraph station's lights turn to an '''orange''' color. Here's the content of the sixth message: |
<code><double_cipher> MORSE MESSAGES BEING INTERCEPTED. BEGINNING FULL ENCRYPTION SOON</code> | <code><double_cipher> MORSE MESSAGES BEING INTERCEPTED. BEGINNING FULL ENCRYPTION SOON</code> | ||
| − | The "double_cipher" is comprised only of single dots and single dashes: E's and T's in Morse code. | + | The "double_cipher" is comprised only of single dots and single dashes: E's and T's in Morse code. The cipher can be solved by converting the transmission into A's and B's, where A is a dot and B is a dash. Then decode the ciphertext (AABBABABBAA etc) using a [http://rumkin.com/tools/cipher/baconian.php Baconian cipher], then decode the output of the Baconian cipher with an [http://rumkin.com/tools/cipher/atbash.php Atbash cipher] to obtain another location from the list. |
Visiting the sixth location yields the sixth symbol: a series of horizontal and vertical lines with the name "EDWARD" prominently featured between them. | Visiting the sixth location yields the sixth symbol: a series of horizontal and vertical lines with the name "EDWARD" prominently featured between them. | ||
| Line 189: | Line 189: | ||
[[File:Symbol_7.png|130px|thumbnail|right|The seventh symbol, "George" (credit to Noizex)]] | [[File:Symbol_7.png|130px|thumbnail|right|The seventh symbol, "George" (credit to Noizex)]] | ||
| − | After finding the sixth symbol, the telegraph station's lights turn to a '''pink''' color. | + | After finding the sixth symbol, the telegraph station's lights turn to a '''pink''' color. Here's an example seventh message, which is a Vigenère cipher: |
<code>PXCGRJIEWSVPIQPVRUIQJEJDPOEEJFEQXETOSWDEUDWHJEDLIVANVPMHOCRQFHYLFWLHZAJDPOEEJDPZWOJXWHED</code> | <code>PXCGRJIEWSVPIQPVRUIQJEJDPOEEJFEQXETOSWDEUDWHJEDLIVANVPMHOCRQFHYLFWLHZAJDPOEEJDPZWOJXWHED</code> | ||
| − | This transmission is encoded via [http://rumkin.com/tools/cipher/vigenere.php Vigenère Cipher] with the key "Edward". | + | This transmission is encoded via [http://rumkin.com/tools/cipher/vigenere.php Vigenère Cipher] with the key "Edward". It decodes to: |
<code>LUGGAGEBASEMENTVARENNESALLIESCANBECLOTHEDASENEMIESENEMIESCANBECLOTHEDASALLIESALWAOSUSEID</code> <br> | <code>LUGGAGEBASEMENTVARENNESALLIESCANBECLOTHEDASENEMIESENEMIESCANBECLOTHEDASALLIESALWAOSUSEID</code> <br> | ||
<code>LUGGAGE BASEMENT VARENNES ALLIES CAN BE CLOTHED AS ENEMIES. ENEMIES CAN BE CLOTHED AS ALLIES. ALWAYS USE ID</code> | <code>LUGGAGE BASEMENT VARENNES ALLIES CAN BE CLOTHED AS ENEMIES. ENEMIES CAN BE CLOTHED AS ALLIES. ALWAYS USE ID</code> | ||
| − | In the example above, <code>LUGGAGE BASEMENT VARENNES</code> may be replaced with any of the locations from the [[Battlefield 1#Winter Update|complete list]]. | + | In the example above, <code>LUGGAGE BASEMENT VARENNES</code> may be replaced with any of the locations from the [[Battlefield 1#Winter Update|complete list]]. Going to the specified location reveals the seventh symbol, which prominently displays the word "George" above a crude drawing. |
==== Eighth Message ==== | ==== Eighth Message ==== | ||
| Line 204: | Line 204: | ||
[[File:Eighth symbol.png|130px|thumbnail|right|The eighth symbol (credit to Noizex)]] | [[File:Eighth symbol.png|130px|thumbnail|right|The eighth symbol (credit to Noizex)]] | ||
| − | After finding the seventh symbol, the telegraph station's lights turn to a '''lime''' color. | + | After finding the seventh symbol, the telegraph station's lights turn to a '''lime''' color. Here's an example eighth message, which is an autokey cipher: |
<code>ONADIFZWMPTJSHJGXROUUEKUWFHGJHNWUYMESYQYXXFAWAUGQNMESY</code> | <code>ONADIFZWMPTJSHJGXROUUEKUWFHGJHNWUYMESYQYXXFAWAUGQNMESY</code> | ||
| Line 213: | Line 213: | ||
<code>HILL BARN ADRIATIC FINAL BELIEVE EVERYTHING REPORT EVERYTHING</code> | <code>HILL BARN ADRIATIC FINAL BELIEVE EVERYTHING REPORT EVERYTHING</code> | ||
| − | In the example above, <code>HILL BARN ADRIATIC</code> may be replaced with any of the locations from the [[Battlefield 1#Winter Update|complete list]]. | + | In the example above, <code>HILL BARN ADRIATIC</code> may be replaced with any of the locations from the [[Battlefield 1#Winter Update|complete list]]. The eighth symbol, which is just the word "LONDON", will be at the specified location. |
==== Ninth Message ==== | ==== Ninth Message ==== | ||
| − | After discovering the eighth "LONDON" symbol, the telegraph station's lights turn '''cyan'''. | + | After discovering the eighth "LONDON" symbol, the telegraph station's lights turn '''cyan'''. In a deviation from the normal structure of the Morse code, '''this cipher is identical for everyone''': |
<code>ZQBRIPPQOHBFIUPEYLAZAMARZIOZDSYJB</code> | <code>ZQBRIPPQOHBFIUPEYLAZAMARZIOZDSYJB</code> | ||
| Line 239: | Line 239: | ||
}} | }} | ||
| − | The final Morse code, once deciphered, directs the player to the balcony of a windmill on the map Giant's Shadow; specifically, the windmill nearest to the German Empire deployment. | + | The final Morse code, once deciphered, directs the player to the balcony of a windmill on the map Giant's Shadow; specifically, the windmill nearest to the German Empire deployment. Standing on the balcony of the windmill and looking outward/slightly upwards ([https://youtu.be/ycXhKjSPSfw video]) while waiting for exactly two minutes will trigger a courier pigeon to swoop past the player. The same dramatic sound effect heard when viewing the symbols will play, and it is a this point that a new dog tag becomes available to the player. The tag is named "'''A Beginning'''", and has the description "'''You've found something that does not belong to you'''". It should be noted that a player will only be able to trigger the pigeon if their telegraph station is on the cyan lights stage (stage 9) - you cannot skip the previous stages. If the dramatic sound does not trigger when the pigeon passes, the process must be repeated until the sound is triggered. Some reports indicate that the sound will not trigger unless the pigeon passes through the player, touching them. Nonetheless, if the pigeon is flying past you, you are at the right stage and have completed the necessary prerequisites. |
| − | In addition to the dog tag, the player's telegraph station's lights will change to a '''red''' color. | + | In addition to the dog tag, the player's telegraph station's lights will change to a '''red''' color. Another Morse code message can be heard with headphones, but at a lower pitch than before, and accompanied by eerie background noise and apparent screaming ([https://youtu.be/sirRAKWbFG4 video]). The message decodes to: |
<code>MASTER MAN</code> | <code>MASTER MAN</code> | ||
| − | The code repeats indefinitely. The meaning of <code>MASTER MAN</code> has yet to be determined, and the whispering/screaming noises in the background have yet to be clearly transcribed. | + | The code repeats indefinitely. The meaning of <code>MASTER MAN</code> has yet to be determined, and the whispering/screaming noises in the background have yet to be clearly transcribed. It has been noted that the Morse code definitely has a space between "Master" and "Man". |
One popular but unproven interpretation of the <code>MASTER MAN</CODE> code is that it refers to '''Charles Masterman''', a prominent British politician who worked in the propaganda department during WWI. Reinforcing this theory is the presence of the letters <code>CM</code> found on the dog tag, which are Charles Masterman's initials. | One popular but unproven interpretation of the <code>MASTER MAN</CODE> code is that it refers to '''Charles Masterman''', a prominent British politician who worked in the propaganda department during WWI. Reinforcing this theory is the presence of the letters <code>CM</code> found on the dog tag, which are Charles Masterman's initials. | ||
| − | Another theory is that <code>MASTER MAN</CODE> refers to a radio operator, as shown below. | + | Another theory is that <code>MASTER MAN</CODE> refers to a radio operator, as shown below. As shown, he has access to telegraphs and colored light signals on a master control board. Through an in-game message by a DICE employee, we were told that "Red is a signal color", in response to queries about the telegraph station's red light. |
[[File:The Master Man.png|250px]] | [[File:The Master Man.png|250px]] | ||
| Line 278: | Line 278: | ||
== Prise de Tahure Update == | == Prise de Tahure Update == | ||
| − | On July 20, 2017, another map was added to the game called '''Prise de Tahure'''. | + | On July 20, 2017, another map was added to the game called '''Prise de Tahure'''. Located on the map were several records, along with a gramophone, much like in the [[#Records and Gramophones|Megalodon Easter egg]]. Bringing a record to the gramophone makes it play the Battlefield theme. At this time it is unknown if the records and gramophone have another purpose. |
=== Four Square Cipher === | === Four Square Cipher === | ||
| Line 284: | Line 284: | ||
[[File:Four Square Code.png|480px|thumbnail|right|The code that appeared on Soissons, along with the hints above it]] | [[File:Four Square Code.png|480px|thumbnail|right|The code that appeared on Soissons, along with the hints above it]] | ||
| − | Also on July 20, a cipher was added to a pillar near the lake north-east of the Château on Soissons. | + | Also on July 20, a cipher was added to a pillar near the lake north-east of the Château on Soissons. Above it were several graphical hints, including the icon of the [[#A Beginning|A Beginning dog tag]] that was unlocked earlier in the ARG. The text of the cipher is as follows: |
<pre> | <pre> | ||
| Line 305: | Line 305: | ||
}} | }} | ||
| − | It was discovered that snuffing out every light source in the castle on the Soisson map causes a [https://youtu.be/g0RIu2Bkim4 mechanical sound effect] to play. | + | It was discovered that snuffing out every light source in the castle on the Soisson map causes a [https://youtu.be/g0RIu2Bkim4 mechanical sound effect] to play. These light sources include candles, chandeliers, and lanterns. After doing this, the bases of the candle stands become interactable - players can switch them on or off. Interacting with candles causes the states of surrounding candles to switch, along with the position in that candle's cycle. There are a total of 7 candles in the castle. Once all the candles have been illuminated, another mechanical noise is heard, which allows us to advance to the next stage. |
| − | The seven candles each switch the state of one or two others. | + | The seven candles each switch the state of one or two others. When any candle is activated, the candles that are switched all rotate one position anticlockwise around the activated candle. By activating a single candle seven times and recording the results, you can learn all of the switch patterns and know they are back where they started. With this knowledge it is possible (with some brain bending) to work out how to illuminate all the candles. This could of course be done with pen-and-paper, but there is an [https://drive.google.com/open?id=0B_Lrn-yWBcQsRXRLWF9mQVVaeTg Excel spreadsheet] (made by Disposalist) as well as an [http://candles.herokuapp.com/ app] that may also prove useful. |
| − | Also, after pressing a candle seven times, only one candle's state will be changed. | + | Also, after pressing a candle seven times, only one candle's state will be changed. All candles go back to their original states after a candle has been pressed fourteen times. |
''Note: If you don't press anything for 4 minutes the candles will reset and the switch patterns will change!'' | ''Note: If you don't press anything for 4 minutes the candles will reset and the switch patterns will change!'' | ||
| Line 321: | Line 321: | ||
[[File:BF1 Sandbag Orientation.png|thumbnail|right|The orientation of the sandbag pattern relative to the grid, courtesy of MozzyFX]] | [[File:BF1 Sandbag Orientation.png|thumbnail|right|The orientation of the sandbag pattern relative to the grid, courtesy of MozzyFX]] | ||
| − | After lighting up all the candles in the castle and hearing the second mechanical noise, some wall panels on pillars on the outside of the castle become interactable. | + | After lighting up all the candles in the castle and hearing the second mechanical noise, some wall panels on pillars on the outside of the castle become interactable. There are 8 pillars on the north side of the castle, and 8 on the south side. |
| − | To the north-east of the castle, there is a statue sunk into the ground, along with 8 concentric square steps leading down towards it. | + | To the north-east of the castle, there is a statue sunk into the ground, along with 8 concentric square steps leading down towards it. After the second mechanical noise is heard, a randomly-generated pattern of sandbags appear on 4 of these steps. They only appear while no one is looking at the steps. '''The goal here is to manipulate the floor lights inside the castle so their pattern matches the pattern of sandbags around the statue.''' |
| − | The pattern of tiles inside the castle consists of an 8 by 8 grid. | + | The pattern of tiles inside the castle consists of an 8 by 8 grid. At the beginning all tiles are turned off. Each individual tile can be manipulated using a '''pair''' of wall panels. There are 8 panels on the north side of the castle, and 8 panels on the south side - each panel corresponds to either a row or a column on the grid. Pressing the pair of panels corresponding to a specific row and column cause the appropriate light to toggle on or off. For example, if you were to press the "2nd column" panel and the "4th row" panel, then the light in position (2, 4) on the board would be toggled. |
| − | However, there is a twist: '''the rows and columns the panels correspond to are completely randomized in each server'''. | + | However, there is a twist: '''the rows and columns the panels correspond to are completely randomized in each server'''. There is no grouping to the panels; for example, not all panels on the north side are the row-controlling panels. This randomization means that players need to use trial and error in each game in order to determine which panels activate which rows and columns. |
One method for accomplishing this is as follows: | One method for accomplishing this is as follows: | ||
| − | # Press any 2 panels outside the castle to activate the a tile light. | + | # Press any 2 panels outside the castle to activate the a tile light. Note the initial configuration of lights, either by taking a screenshot or by marking it down. |
| − | # Choose an arbitrary panel from one of the 16 panels outside the castle. | + | # Choose an arbitrary panel from one of the 16 panels outside the castle. (You could start with the panel labelled '1' on the [[#Tile Puzzle|map shown above]].) |
| − | # Try pressing your chosen panel followed by another arbitrary panel. | + | # Try pressing your chosen panel followed by another arbitrary panel. (Again, you could use the panel labelled '2' on the map.) |
| − | # Check the light grid. | + | # Check the light grid. If no lights have changed, pick a new panel as your second panel, and try pressing it along with your first one. Repeat this until a light changes on your grid. |
# Once a light on your grid has changed, note its position in the grid along with the panels you used to activate it. | # Once a light on your grid has changed, note its position in the grid along with the panels you used to activate it. | ||
| − | # Pick a different panel that you haven't tried yet as your second panel, keeping the first panel the same. | + | # Pick a different panel that you haven't tried yet as your second panel, keeping the first panel the same. Continue to try new combinations that include the first panel until another light is toggled. |
| − | # By this point, you should have toggled 2 different lights, and you should have had 1 panel (the first panel) in common with both of those lights. | + | # By this point, you should have toggled 2 different lights, and you should have had 1 panel (the first panel) in common with both of those lights. The two lights you toggled will share either a row or a column on the grid. |
| − | # '''The panel the lights had in common (the first panel) can now be associated with the row or column that contained the toggled lights.''' | + | # '''The panel the lights had in common (the first panel) can now be associated with the row or column that contained the toggled lights.''' The other 2 panels you pressed can be associated with the intersecting rows or columns. |
| − | # Repeat the whole process, starting with a different panel. | + | # Repeat the whole process, starting with a different panel. Continue until every panel's row or column is identified. |
<div style="margin-left:60px;margin-right:60px;margin-top:20px;margin-bottom:20px;padding-left:15px;padding-right:15px;padding-top:5px;padding-bottom:5px;background-color:#FFB5B5;border:4px solid red;border-radius:15px;"> | <div style="margin-left:60px;margin-right:60px;margin-top:20px;margin-bottom:20px;padding-left:15px;padding-right:15px;padding-top:5px;padding-bottom:5px;background-color:#FFB5B5;border:4px solid red;border-radius:15px;"> | ||
| Line 346: | Line 346: | ||
* Let's say we start out trying to identify Panel 1. | * Let's say we start out trying to identify Panel 1. | ||
* We try pressing Panel 1 and Panel 2, but nothing changes, so we move on. | * We try pressing Panel 1 and Panel 2, but nothing changes, so we move on. | ||
| − | * We try pressing Panel 1 and Panel 3, and a light changes at position (1, 5) (first column, fifth row). | + | * We try pressing Panel 1 and Panel 3, and a light changes at position (1, 5) (first column, fifth row). We note this down and move on. |
* We try pressing Panel 1 and Panel 4, but nothing changes. | * We try pressing Panel 1 and Panel 4, but nothing changes. | ||
* We try pressing Panel 1 and Panel 5, but nothing changes. | * We try pressing Panel 1 and Panel 5, but nothing changes. | ||
| − | * We try pressing Panel 1 and Panel 6, and a light changes at position (6, 5) (sixth column, fifth row). | + | * We try pressing Panel 1 and Panel 6, and a light changes at position (6, 5) (sixth column, fifth row). We note this down. |
| − | * The two lights that changed were both part of the 5th row, and we pressed Panel 1 in both cases. | + | * The two lights that changed were both part of the 5th row, and we pressed Panel 1 in both cases. Therefore, Panel 1 must be the button for the fifth row. |
* In addition, from the first light that changed, since we know that Panel 1 is the button for the fifth row, Panel 3 must be the button for the first column. | * In addition, from the first light that changed, since we know that Panel 1 is the button for the fifth row, Panel 3 must be the button for the first column. | ||
* Similarly, from the second light, since we know that Panel 1 is the button for the fifth row, Panel 6 must be the button for the sixth column. | * Similarly, from the second light, since we know that Panel 1 is the button for the fifth row, Panel 6 must be the button for the sixth column. | ||
| Line 359: | Line 359: | ||
</div> | </div> | ||
| − | Once each panel's functionality has been determined, matching the lights up with the sandbags is a fairly simple (if tedious) task. | + | Once each panel's functionality has been determined, matching the lights up with the sandbags is a fairly simple (if tedious) task. The sandbags appear on only 4 of the 8 concentric steps, which correspond to square "rings" on the light grid. The position of the sandbags along each step indicates that the light in the corresponding location on the grid needs to be turned on. All other lights need to be turned off. |
An example sandbag pattern is shown below: | An example sandbag pattern is shown below: | ||
| Line 373: | Line 373: | ||
[[File:Bf1 Conflict Dogtag.png|250px|thumbnail|right|The "A Conflict" dog tag, awarded to the player that completes the tile puzzle]] | [[File:Bf1 Conflict Dogtag.png|250px|thumbnail|right|The "A Conflict" dog tag, awarded to the player that completes the tile puzzle]] | ||
| − | Once the tile/sandbag puzzle has been completed, a plume of black smoke appears, and the '''A Conflict''' dog tag is awarded to the player who activated the final panel - '''the dog tag is NOT awarded to all players on the server''', only the person who completes the Easter egg! | + | Once the tile/sandbag puzzle has been completed, a plume of black smoke appears, and the '''A Conflict''' dog tag is awarded to the player who activated the final panel - '''the dog tag is NOT awarded to all players on the server''', only the person who completes the Easter egg! The dog tag has the same skull icon as the [[#A Beginning|A Beginning]] dog tag, but is silver instead of bronze. |
''Note: The A Beginning dog tag is '''not''' required to unlock the A Conflict dog tag!'' | ''Note: The A Beginning dog tag is '''not''' required to unlock the A Conflict dog tag!'' | ||
| Line 382: | Line 382: | ||
</pre> | </pre> | ||
| − | Prominently featured on the dog tag are the stylized initials <code>WH</code>. | + | Prominently featured on the dog tag are the stylized initials <code>WH</code>. It is suspected that WH is an abbreviation for [https://en.wikipedia.org/wiki/Wellington_House Wellington House], which was Britain's War Propaganda bureau during World War 1. The organization was led by [https://en.wikipedia.org/wiki/Charles_Masterman Charles Masterman], whose initials were seen on the [[#A Beginning|A Beginning]] dog tag, further confirming the connection. |
[[Category: Battlefield 1]] | [[Category: Battlefield 1]] | ||
Revision as of 16:08, 31 October 2017
| Battlefield 1 | |
|---|---|
| The Battlefield 1 ARG - Headphones and Morse code led to mysterious unlockable dog tags. | |
| Type | [[List_of_Investigations#Official|Official]] |
| Creator | EA Dice |
| Discovered | 2017-02-14 |

Main Page > List of Investigations > Battlefield 1
This wiki page documents the ARG that is hidden in Battlefield 1. This page includes step-by-step instructions to unlock the secret "A Beginning" and "A Conflict" dog tags. Currently, the primary solving hub for this ARG is the Battlefield Easter Egg community, who have a Discord server here, a wiki here, and a YouTube channel here.
In addition to the main ARG/Easter egg which unlocks the secret dog tags, there are several other prominent Easter eggs which have been discovered in the game:
| Battlefield 1 Easter Eggs | |
|---|---|
| Miscellaneous | Smaller, less convoluted Easter eggs |
| Balloon House | A house kept aloft by balloons, referencing the movie 'Up' |
| Megalodon | A giant shark hidden on Fort de Vaux |
(Note: Main ARG/Easter egg is disabled in password-protected servers!)
Headphones and Morse code
One pair of headphones is hidden on each map. The headphones are indestructible and can be located on every server, as long as they have not already been picked up. It appears that there are 5 spawn locations per map, although some of them remain undiscovered. The headphones can be picked up by any player by walking over them. Upon approaching a hidden telegraph station after having retrieved a pair of headphones, the player will hear some Morse code being tapped out. A player can carry only one pair of headphones at a time, and only the player wearing the headphones will be able to hear the Morse code when near enough to a hidden telegraph station.
Headphone Locations
Here is is a series of images, made by RenegadeX5, which display locations of headphones and telegraph station on each map. In order to hear the Morse code, you need to pick up the headphones from one of the 5 locations on each map (you might need to check all 5 before finding them!) and bring them to the telegraph station.
(Note: you can click each image to get a larger version.)
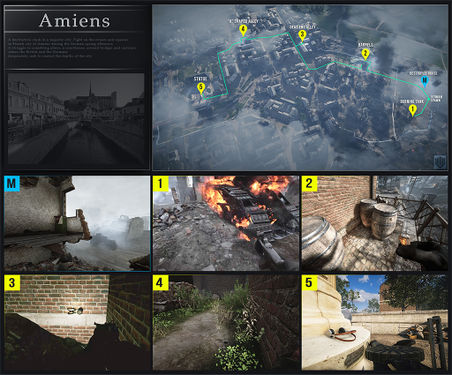
Amiens
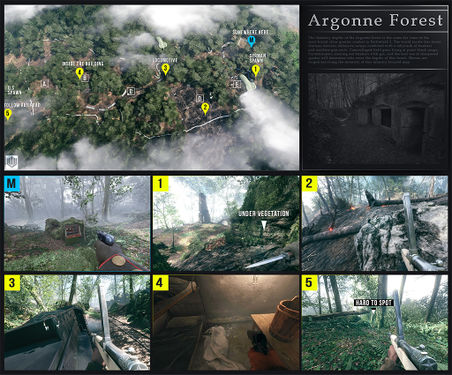
Argonne Forest
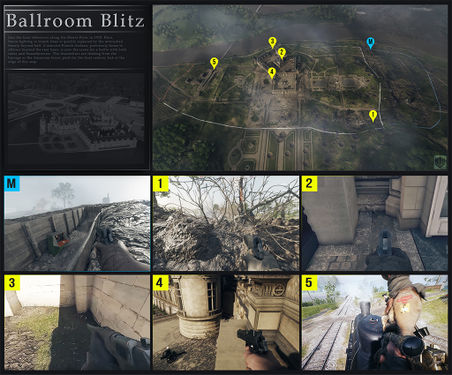
Ballroom Blitz
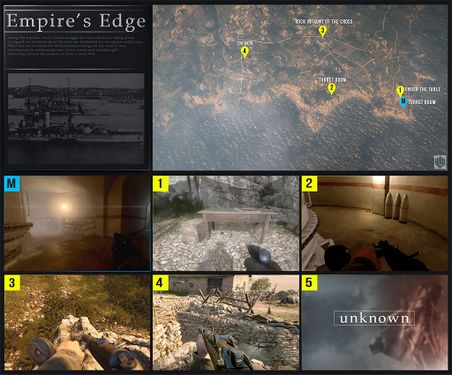
Empire's Edge
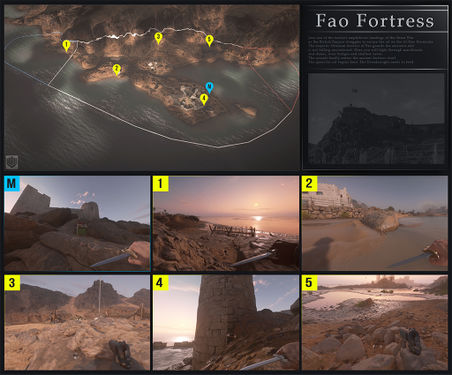
Fao Fortress
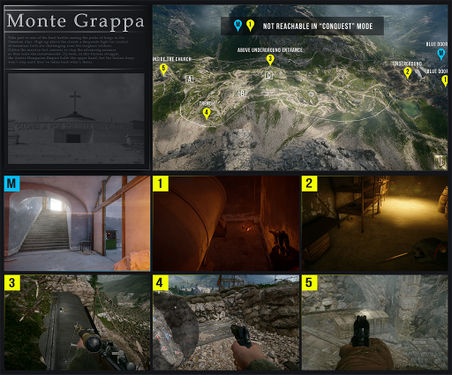
Monte Grappa
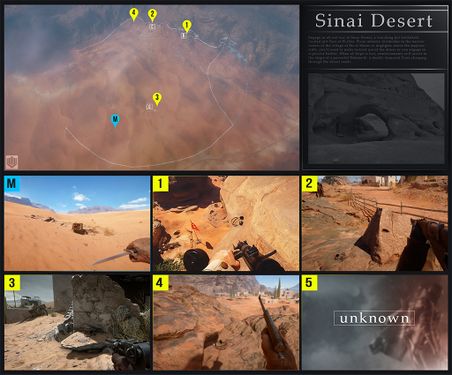
Sinai Desert
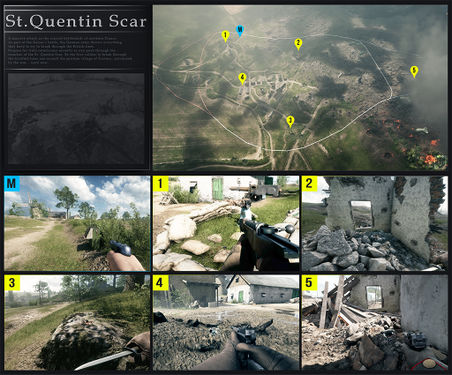
St. Quentin Scar
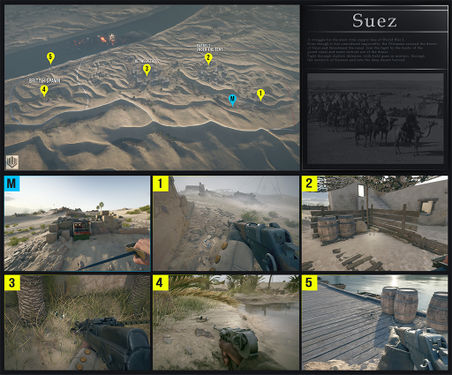
Suez


When the headphones and telegraph stations were first discovered, the Morse code was meaningless gibberish. However, the contents of the Morse code changed in future patches.
Fall Update
On November 15th, Battlefield 1 received an update which changed the Morse code heard on all maps' hidden telegraph stations to the following:
.--. .-. . ...- .. --- ..- ... | -- . ... ... .- --. . | -.-. --- .-. .-. ..- .--. - . -..
.- .-- .- .. - | ..-. ..- .-. - .... . .-. | .. -. ... - .-. ..- -.-. - .. --- -. ...
PREVIOUS MESSAGE CORRUPTED
AWAIT FURTHER INSTRUCTIONS
Additionally, the patch changed the following things:
- Ballroom Blitz had a telegraph station and headphones added to it, whereas pre-patch it was the only map with neither
- The spawn locations of many headphones on most maps were changed
- The above Morse message now plays on loop until the telegraph station eventually explodes, although this appears to be buggy
- Once the telegraph station explodes, headphones stop spawning on the map
- Dying after having retrieved a pair of headphones will no longer cause a new pair of headphones to spawn
- Only one pair of headphones will spawn upon the initiation of a round on each map
Winter Update
On February 14, the Winter Update was released. The Morse code changed again, to the following message:
GO STRAIGHT TO <location_name>. OLD METHODS COMPROMISED. MUST ACQUIRE NEW KEY. WILL MISS DROPOFF IF DELAY OR INCORRECT LOCATION.
Each user hears a different location name; locations are randomly assigned to players. There are 27 locations total: 3 locations on each of the 9 maps. In order to advance through the Easter egg, you need to know which location you are assigned; here is a tutorial (courtesy of Dunem) to help you read your Morse code. This is the list of locations, along with their respective maps, in alphabetical order:
-
AMIENS NEUF FURNITURE: Amiens -
BALLROOM MAP VARENNES: Ballroom Blitz (FormerlyABBEY MAP VARENNES) -
BUCKET MARSHLANDS FAW: Fao Fortress -
CANAL KANTARA VASES: Suez -
CASTELLO ISLE ADRIATIC: Empire Edge -
CHURCH RUINS AMIENS: Amiens -
COASTAL FORTRESS ADRIATIC: Empire Edge -
CRATE JABAL JIFAR: Sinai Desert -
CRATE SEREN VENETIAN: Monte Grappa -
CRATE TRENCH CANAL: Suez -
FERRO FIRE VENETIAN: Monte Grappa -
HILL BARN ADRIATIC: Empire Edge -
HILL TOWER CANAL: Suez -
HOTEL CHECK PERONNE: St. Quentin Scar -
LONGUEVILLE STATUE AMIENS: Amiens -
LUGGAGE BASEMENT APREMONT: Argonne Forest (FormerlyLUGGAGE BASEMENT VARENNES) -
OUTPOST BARREL FAW: Fao Fortress -
PANEL WATER APREMONT: Argonne Forest (FormerlyPANEL WATER VARENNES) -
PILLAR OUTSKIRTS JIFAR: Sinai Desert -
PILLOW MAZAR JIFAR: Sinai Desert -
RUIN VENTURE PERONNE: St. Quentin Scar -
STATUES GARDEN VARENNES: Ballroom Blitz (FormerlySTATUES GARDEN APREMONT) -
STOVE TURRET VENETIAN: Monte Grappa -
TRAVECY ATTIC PERONNE: St. Quentin Scar -
TREE FORTRESS FAW: Fao Fortress -
TREE TRAIN APREMONT: Argonne Forest (FormerlyTREE TRAIN VARENNES) -
VARENNES SERVANT BED: Ballroom Blitz (FormerlyAPREMONT RITZ BED)
The message will repeat until you move away from the telegraph station, at which point the telegraph station will explode. Each of the locations mentioned above has a symbol near it.
Symbols
The first symbols discovered at each location are difficult to find; they are small double arrows pointing to the left and right, and only appear when the player comes within 0.4 meters. A player will typically need to crouch or go prone in order to be able to see their symbol. Additionally, players can only see the symbol at the location they've been "assigned" to. When examining a symbol up close, a distinct sound is played (video). Pictured below are all 27 symbol locations, sorted by the map they appear on (maps made by Darrel).
NOTE: If you're having trouble finding your location with the images below, Jambajeww has made a video guide for all 27 locations, with timestamps for each location in the description of the video.
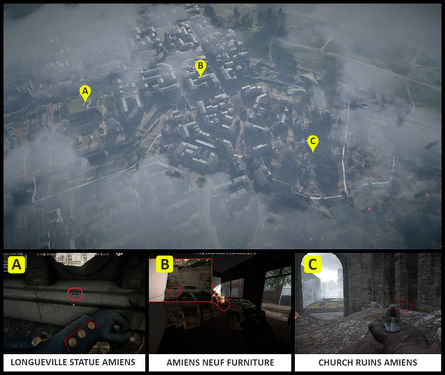
Amiens
AMIENS NEUF FURNITURE
CHURCH RUINS AMIENS
LONGUEVILLE STATUE AMIENS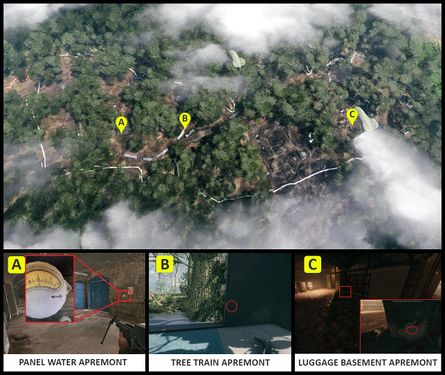
Argonne Forest
LUGGAGE BASEMENT APREMONT
PANEL WATER APREMONT
TREE TRAIN APREMONT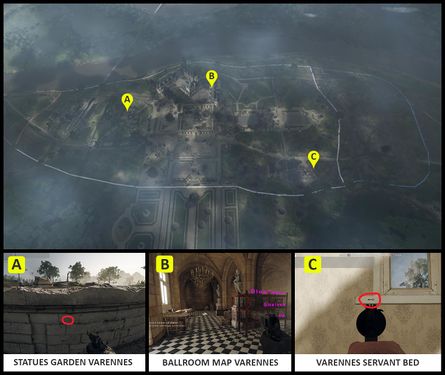
Ballroom Blitz
BALLROOM MAP VARENNES
VARENNES SERVANT BED
STATUES GARDEN VARENNES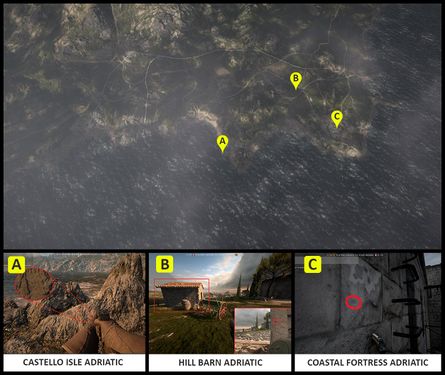
Empire's Edge
CASTELLO ISLE ADRIATIC
COASTAL FORTRESS ADRIATIC
HILL BARN ADRIATIC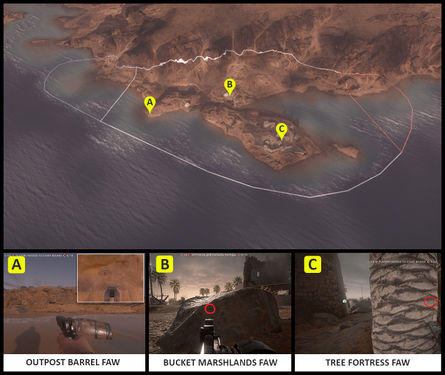
Fao Fortress
BUCKET MARSHLANDS FAW
OUTPOST BARREL FAW
TREE FORTRESS FAW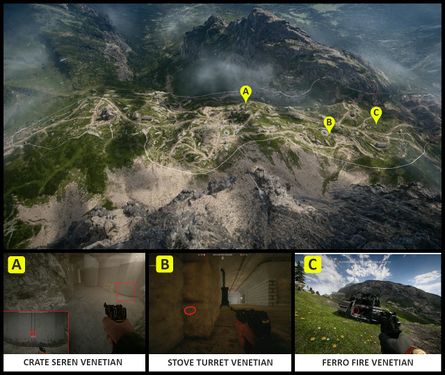
Monte Grappa
CRATE SEREN VENETIAN
FERRO FIRE VENETIAN
STOVE TURRET VENETIAN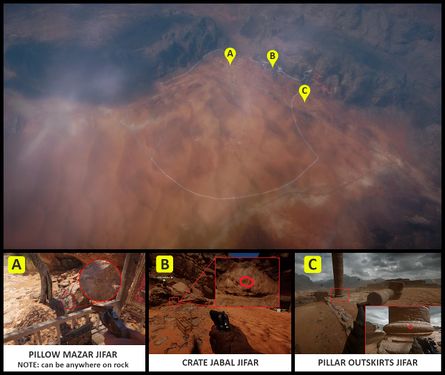
Sinai Desert
CRATE JABAL JIFAR
PILLAR OUTSKIRTS JIFAR
PILLOW MAZAR JIFAR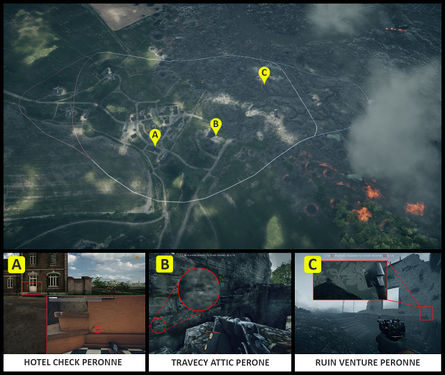
St. Quentin Scar
HOTEL CHECK PERONNE
RUIN VENTURE PERONNE
TRAVECY ATTIC PERONNE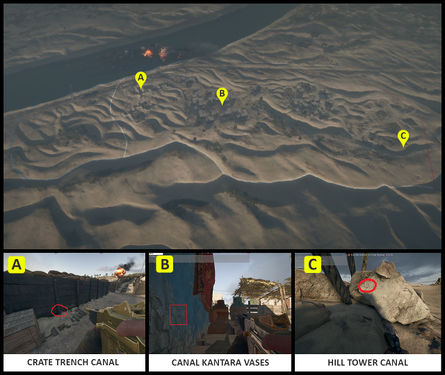
Suez
CANAL KANTARA VASES
CRATE TRENCH CANAL
HILL TOWER CANAL


Second Message

After a player discovers their symbol, returning to a telegraph station with headphones yields another message in Morse code. Additionally, the telegraph station's lights glow yellow instead of their usual white when broadcasting this message. The message starts with one of the above location names, but reversed:
<reversed_location_name> REMEMBER FIRST RULE. IF COMPROMISED L PILL.
An L PILL is short for lethal pill, a pill intended to be taken by soldiers to commit suicide rather than be tortured. Visiting the specified reversed location, the second location, yields a triangle symbol in place of the normal double-arrow symbol. The second symbol appears in the exact same spot that the first symbol may appear for other players.
Third Message

After a player discovers the triangle symbol at their second location, returning to a telegraph station with headphones yields another message. This time, the telegraph station's lights glow purple. Here's the text of the message:
<atbash_cipher> SECOND RULE. SIGHTING. REPORT AND WAIT. INVESTIGATING ALONE COULD LEAD TO DEATH
Solving the Atbash cipher in the message yields another location from the list above. Visiting the third location leads to an arrow symbol pointing right.
Fourth Message

Returning to a telegraph station after discovering the third symbol yields yet another message. This time, the telegraph station's lights glow green (previously, they glowed white, yellow, and purple for the first, second, and third messages respectively). Here's the text of the message:
<rot_cipher> THIRD RULE. IF TAKEN BY THE OTHERS DISCOVER MEANS TO COMMUNICATE TO HOUSE
Solving the ROT cipher with a key of 7 (N = 19) yields another location from the list of locations, leading to a fourth symbol, which is shown on the right.
Fifth Message

After finding the fourth symbol, the telegraph station's light color turns transparent. This message begins with a location from the list of locations, reversed and encoded with the rail fence cipher, with 5 rails, and 0 offset. (Note: Some players report rails 5 offset 0 does not yield plaintext. The ciphertext must be reversed before it is input into the rail fence cipher to get plaintext with rails 5 offset 0.). Note that the previous symbol, the fourth symbol, is in the shape of a fence, which may be interpreted as a hint for the correct decryption method for this cipher (rail fence cipher). Here's the format of the message:
<rail_fence> FOURTH RULE. KILL ALL ON SAME TRAIL. REMOVE DOG TAGS AND REPORT TO HOUSE
The fifth symbol is a pattern of broken and unbroken dashes.
Note: the cipher on this stage can also be solved as an anagram.
Sixth Message

After finding the fifth symbol, the telegraph station's lights turn to an orange color. Here's the content of the sixth message:
<double_cipher> MORSE MESSAGES BEING INTERCEPTED. BEGINNING FULL ENCRYPTION SOON
The "double_cipher" is comprised only of single dots and single dashes: E's and T's in Morse code. The cipher can be solved by converting the transmission into A's and B's, where A is a dot and B is a dash. Then decode the ciphertext (AABBABABBAA etc) using a Baconian cipher, then decode the output of the Baconian cipher with an Atbash cipher to obtain another location from the list.
Visiting the sixth location yields the sixth symbol: a series of horizontal and vertical lines with the name "EDWARD" prominently featured between them.
Seventh Message

After finding the sixth symbol, the telegraph station's lights turn to a pink color. Here's an example seventh message, which is a Vigenère cipher:
PXCGRJIEWSVPIQPVRUIQJEJDPOEEJFEQXETOSWDEUDWHJEDLIVANVPMHOCRQFHYLFWLHZAJDPOEEJDPZWOJXWHED
This transmission is encoded via Vigenère Cipher with the key "Edward". It decodes to:
LUGGAGEBASEMENTVARENNESALLIESCANBECLOTHEDASENEMIESENEMIESCANBECLOTHEDASALLIESALWAOSUSEID
LUGGAGE BASEMENT VARENNES ALLIES CAN BE CLOTHED AS ENEMIES. ENEMIES CAN BE CLOTHED AS ALLIES. ALWAYS USE ID
In the example above, LUGGAGE BASEMENT VARENNES may be replaced with any of the locations from the complete list. Going to the specified location reveals the seventh symbol, which prominently displays the word "George" above a crude drawing.
Eighth Message

After finding the seventh symbol, the telegraph station's lights turn to a lime color. Here's an example eighth message, which is an autokey cipher:
ONADIFZWMPTJSHJGXROUUEKUWFHGJHNWUYMESYQYXXFAWAUGQNMESY
This message decodes to the following, by using an autokey cipher with passphrase of "George" and alphabet key of ZABCDEFGHIJKLMNOPQRSTUVWXY:
HILLBARNADRIATICFINALBELIEVEEVERYTHINGREPORTEVERYTHING
HILL BARN ADRIATIC FINAL BELIEVE EVERYTHING REPORT EVERYTHING
In the example above, HILL BARN ADRIATIC may be replaced with any of the locations from the complete list. The eighth symbol, which is just the word "LONDON", will be at the specified location.
Ninth Message
After discovering the eighth "LONDON" symbol, the telegraph station's lights turn cyan. In a deviation from the normal structure of the Morse code, this cipher is identical for everyone:
ZQBRIPPQOHBFIUPEYLAZAMARZIOZDSYJB
After a long search, it was finally discovered that reversing the above ciphertext and using the reverse as input for an autokey cipher with key "LONDON" and custom alphabet ZABCDEFGHIJKLMNOPQRSTUVWXY yields:
PUKOOLYNOCLABLLIMDNIWWODAHSSTNAIG
If you reverse this output, it reads:
GIANTSSHADOWWINDMILLBALCONYLOOKUP
GIANTS SHADOW WINDMILL BALCONY LOOK UP
A Beginning
The final Morse code, once deciphered, directs the player to the balcony of a windmill on the map Giant's Shadow; specifically, the windmill nearest to the German Empire deployment. Standing on the balcony of the windmill and looking outward/slightly upwards (video) while waiting for exactly two minutes will trigger a courier pigeon to swoop past the player. The same dramatic sound effect heard when viewing the symbols will play, and it is a this point that a new dog tag becomes available to the player. The tag is named "A Beginning", and has the description "You've found something that does not belong to you". It should be noted that a player will only be able to trigger the pigeon if their telegraph station is on the cyan lights stage (stage 9) - you cannot skip the previous stages. If the dramatic sound does not trigger when the pigeon passes, the process must be repeated until the sound is triggered. Some reports indicate that the sound will not trigger unless the pigeon passes through the player, touching them. Nonetheless, if the pigeon is flying past you, you are at the right stage and have completed the necessary prerequisites.
In addition to the dog tag, the player's telegraph station's lights will change to a red color. Another Morse code message can be heard with headphones, but at a lower pitch than before, and accompanied by eerie background noise and apparent screaming (video). The message decodes to:
MASTER MAN
The code repeats indefinitely. The meaning of MASTER MAN has yet to be determined, and the whispering/screaming noises in the background have yet to be clearly transcribed. It has been noted that the Morse code definitely has a space between "Master" and "Man".
One popular but unproven interpretation of the MASTER MAN code is that it refers to Charles Masterman, a prominent British politician who worked in the propaganda department during WWI. Reinforcing this theory is the presence of the letters CM found on the dog tag, which are Charles Masterman's initials.
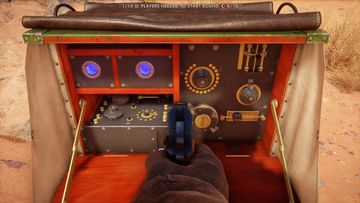
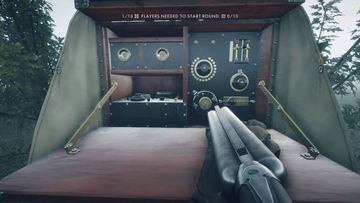
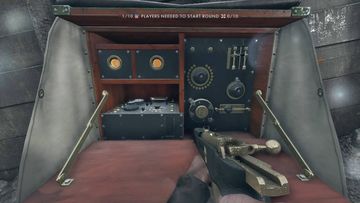
Another theory is that MASTER MAN refers to a radio operator, as shown below. As shown, he has access to telegraphs and colored light signals on a master control board. Through an in-game message by a DICE employee, we were told that "Red is a signal color", in response to queries about the telegraph station's red light.

Additional Resources
All the telegraph station's light colors:
Stage 1 (white lights)
Stage 2 (yellow lights)
Stage 3 (purple lights)
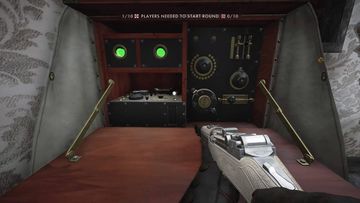
Stage 4 (green lights)
Stage 5 (clear lights)
Stage 6 (orange lights)
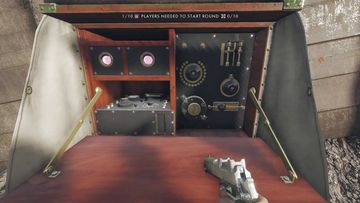
Stage 7 (pink lights)
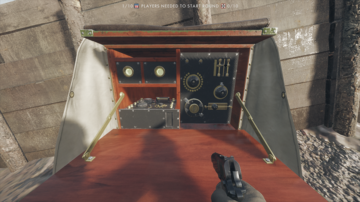
Stage 8 (lime lights)
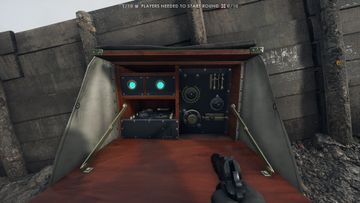
Stage 9 (cyan lights)

Stage 10 (red lights)


The following image was datamined after the release of the Winter Update patch on February 14, 2017:

Between its color channels, this image contains all of the symbols mentioned above.
Prise de Tahure Update
On July 20, 2017, another map was added to the game called Prise de Tahure. Located on the map were several records, along with a gramophone, much like in the Megalodon Easter egg. Bringing a record to the gramophone makes it play the Battlefield theme. At this time it is unknown if the records and gramophone have another purpose.
Four Square Cipher

Also on July 20, a cipher was added to a pillar near the lake north-east of the Château on Soissons. Above it were several graphical hints, including the icon of the A Beginning dog tag that was unlocked earlier in the ARG. The text of the cipher is as follows:
YPIVEZKUSYRNHZELDWSOMSPXINALXGWNHACPLTVZPNCPLBRPVXYPTHWNHQALYG
When solved as a four-square cipher using the keywords of MASTER and MAN, and reversing the remainder of the alphabet, the cipher was decoded:
INSIDE THE CHATEAU WHEN ALL IS DARK THERE YOU GO AND YOU WILL FIND THE SPARKS
Lights Out
It was discovered that snuffing out every light source in the castle on the Soisson map causes a mechanical sound effect to play. These light sources include candles, chandeliers, and lanterns. After doing this, the bases of the candle stands become interactable - players can switch them on or off. Interacting with candles causes the states of surrounding candles to switch, along with the position in that candle's cycle. There are a total of 7 candles in the castle. Once all the candles have been illuminated, another mechanical noise is heard, which allows us to advance to the next stage.
The seven candles each switch the state of one or two others. When any candle is activated, the candles that are switched all rotate one position anticlockwise around the activated candle. By activating a single candle seven times and recording the results, you can learn all of the switch patterns and know they are back where they started. With this knowledge it is possible (with some brain bending) to work out how to illuminate all the candles. This could of course be done with pen-and-paper, but there is an Excel spreadsheet (made by Disposalist) as well as an app that may also prove useful.
Also, after pressing a candle seven times, only one candle's state will be changed. All candles go back to their original states after a candle has been pressed fourteen times.
Note: If you don't press anything for 4 minutes the candles will reset and the switch patterns will change!
Tile Puzzle


After lighting up all the candles in the castle and hearing the second mechanical noise, some wall panels on pillars on the outside of the castle become interactable. There are 8 pillars on the north side of the castle, and 8 on the south side.
To the north-east of the castle, there is a statue sunk into the ground, along with 8 concentric square steps leading down towards it. After the second mechanical noise is heard, a randomly-generated pattern of sandbags appear on 4 of these steps. They only appear while no one is looking at the steps. The goal here is to manipulate the floor lights inside the castle so their pattern matches the pattern of sandbags around the statue.
The pattern of tiles inside the castle consists of an 8 by 8 grid. At the beginning all tiles are turned off. Each individual tile can be manipulated using a pair of wall panels. There are 8 panels on the north side of the castle, and 8 panels on the south side - each panel corresponds to either a row or a column on the grid. Pressing the pair of panels corresponding to a specific row and column cause the appropriate light to toggle on or off. For example, if you were to press the "2nd column" panel and the "4th row" panel, then the light in position (2, 4) on the board would be toggled.
However, there is a twist: the rows and columns the panels correspond to are completely randomized in each server. There is no grouping to the panels; for example, not all panels on the north side are the row-controlling panels. This randomization means that players need to use trial and error in each game in order to determine which panels activate which rows and columns.
One method for accomplishing this is as follows:
- Press any 2 panels outside the castle to activate the a tile light. Note the initial configuration of lights, either by taking a screenshot or by marking it down.
- Choose an arbitrary panel from one of the 16 panels outside the castle. (You could start with the panel labelled '1' on the map shown above.)
- Try pressing your chosen panel followed by another arbitrary panel. (Again, you could use the panel labelled '2' on the map.)
- Check the light grid. If no lights have changed, pick a new panel as your second panel, and try pressing it along with your first one. Repeat this until a light changes on your grid.
- Once a light on your grid has changed, note its position in the grid along with the panels you used to activate it.
- Pick a different panel that you haven't tried yet as your second panel, keeping the first panel the same. Continue to try new combinations that include the first panel until another light is toggled.
- By this point, you should have toggled 2 different lights, and you should have had 1 panel (the first panel) in common with both of those lights. The two lights you toggled will share either a row or a column on the grid.
- The panel the lights had in common (the first panel) can now be associated with the row or column that contained the toggled lights. The other 2 panels you pressed can be associated with the intersecting rows or columns.
- Repeat the whole process, starting with a different panel. Continue until every panel's row or column is identified.
Example:
- Let's say we start out trying to identify Panel 1.
- We try pressing Panel 1 and Panel 2, but nothing changes, so we move on.
- We try pressing Panel 1 and Panel 3, and a light changes at position (1, 5) (first column, fifth row). We note this down and move on.
- We try pressing Panel 1 and Panel 4, but nothing changes.
- We try pressing Panel 1 and Panel 5, but nothing changes.
- We try pressing Panel 1 and Panel 6, and a light changes at position (6, 5) (sixth column, fifth row). We note this down.
- The two lights that changed were both part of the 5th row, and we pressed Panel 1 in both cases. Therefore, Panel 1 must be the button for the fifth row.
- In addition, from the first light that changed, since we know that Panel 1 is the button for the fifth row, Panel 3 must be the button for the first column.
- Similarly, from the second light, since we know that Panel 1 is the button for the fifth row, Panel 6 must be the button for the sixth column.
From here, determining the rest of the panels' functions by trying unknown panels with known ones is easy.
Note: If a given pair of buttons causes no change in the light grid, they must both either be for rows or columns, since they do not intersect.
Once each panel's functionality has been determined, matching the lights up with the sandbags is a fairly simple (if tedious) task. The sandbags appear on only 4 of the 8 concentric steps, which correspond to square "rings" on the light grid. The position of the sandbags along each step indicates that the light in the corresponding location on the grid needs to be turned on. All other lights need to be turned off.
An example sandbag pattern is shown below:
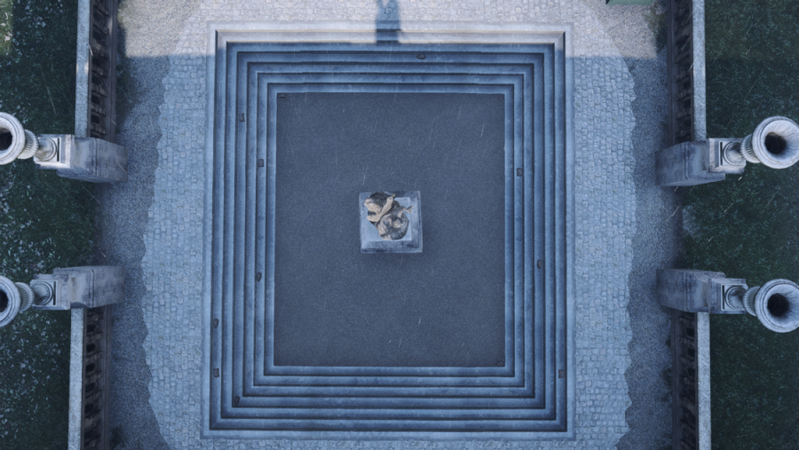
A pattern of sandbags on the square stairs around the statue (up = northeast)
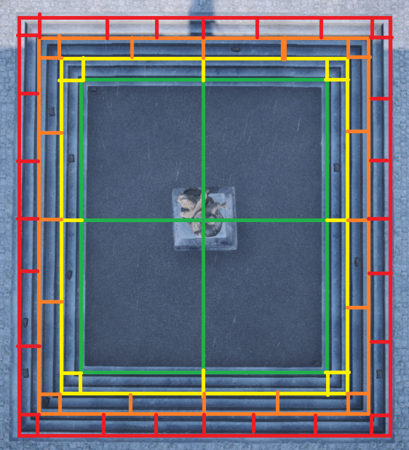
Fitting the sandbag positions to the 8 by 8 grid
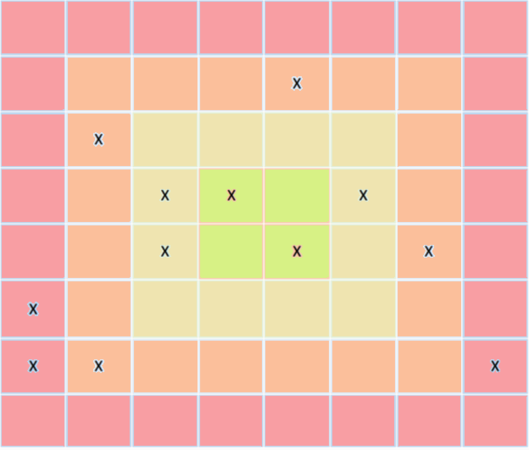
The corresponding pattern that needs to be illuminated on the grid (up = west)


A Conflict

Once the tile/sandbag puzzle has been completed, a plume of black smoke appears, and the A Conflict dog tag is awarded to the player who activated the final panel - the dog tag is NOT awarded to all players on the server, only the person who completes the Easter egg! The dog tag has the same skull icon as the A Beginning dog tag, but is silver instead of bronze.
Note: The A Beginning dog tag is not required to unlock the A Conflict dog tag!
The dog tag's description is as follows:
The voices have been silent far too long.
Prominently featured on the dog tag are the stylized initials WH. It is suspected that WH is an abbreviation for Wellington House, which was Britain's War Propaganda bureau during World War 1. The organization was led by Charles Masterman, whose initials were seen on the A Beginning dog tag, further confirming the connection.